Table of Contents
Below is the documentation I wrote in 2020 for this project, reformatted slightly for posting.
Bride's Little Schaube
from a 16th century Austrian tailor's manual
Objective:
Make a nice, persona-appropriate, top layer suitable for camping in Tir Righ weather.
My persona, Greta Grunwald, is from a family in the upper merchant class around the turn of the 16th to 17th century in Salzburg. 'Suitable for camping in Tir Righ weather' ideally means something that can withstand rain, cold, and muck graciously. Additionally if I am active (as I often would be at a camp) I like to have my arms free and I find a long cloak gets in the way. For extra warmth, something longer than a goller (which only covers the shoulders) would be good.
Reference Items and Aesthetic:
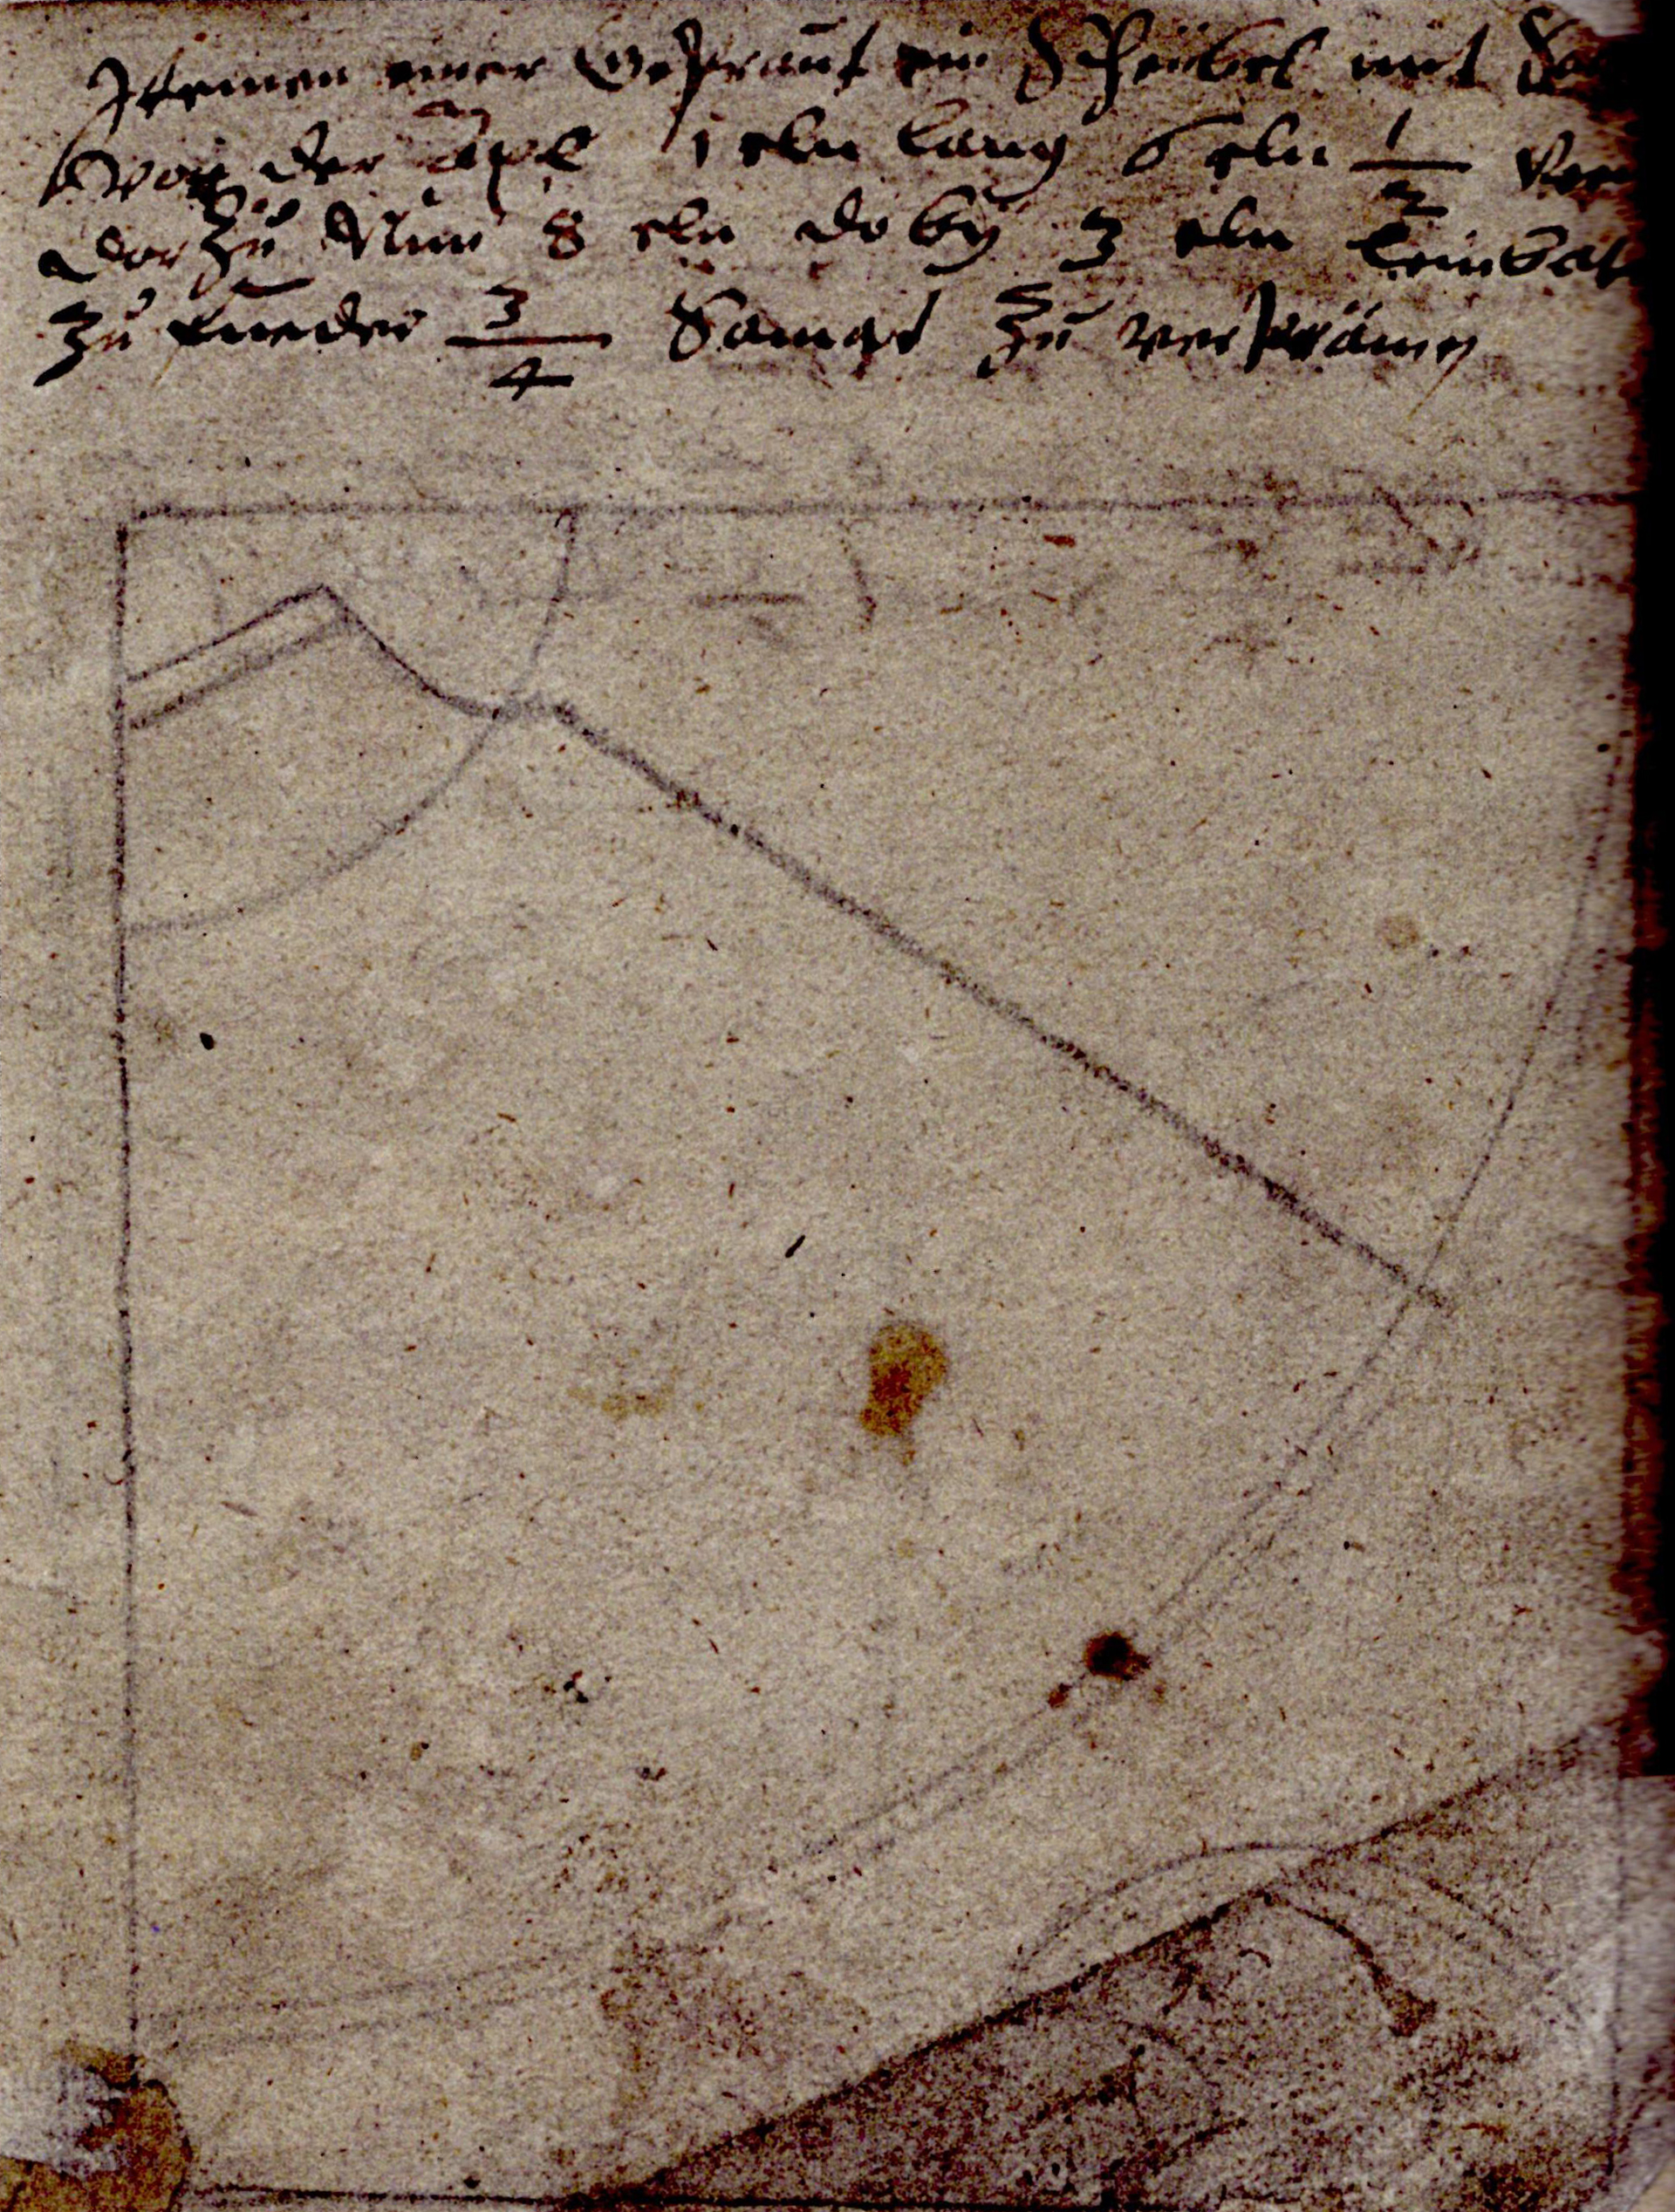
Figure 1. Cutting diagram and instructions from Leonfeldner 20r
Drei Schnittbücher brings together three tailors' masterbooks from the late 16th century in the area that is now Austria. Figure 1 is a reproduction from the Leonfeldner book (page 262 of Drei Schnittbücher) containing the cutting diagram and instructions for this garment. The Leonfelder masterbook is dated to around 1590 and is a copy of an official guild document, possibly a tailor's personal study notebook for the Master tailor's test. It may have been a copy of the Enns official tailors' guild document as it shares many similarities. The Enns document is another of the three documents included in Drei Schnittbücher, and details the testing required for tailors to become masters, relevant sumptuary laws, and guild regulations in addition to the test material.
Bad Leonfelden was a town with a population most likely of less than 2000 people in the 16th century. Most of the town's income was from farming and the salt trade. It was on the salt trade road and was the big market town in the area.1
Figure 2 and 3 show some contemporary examples of the garment being worn.
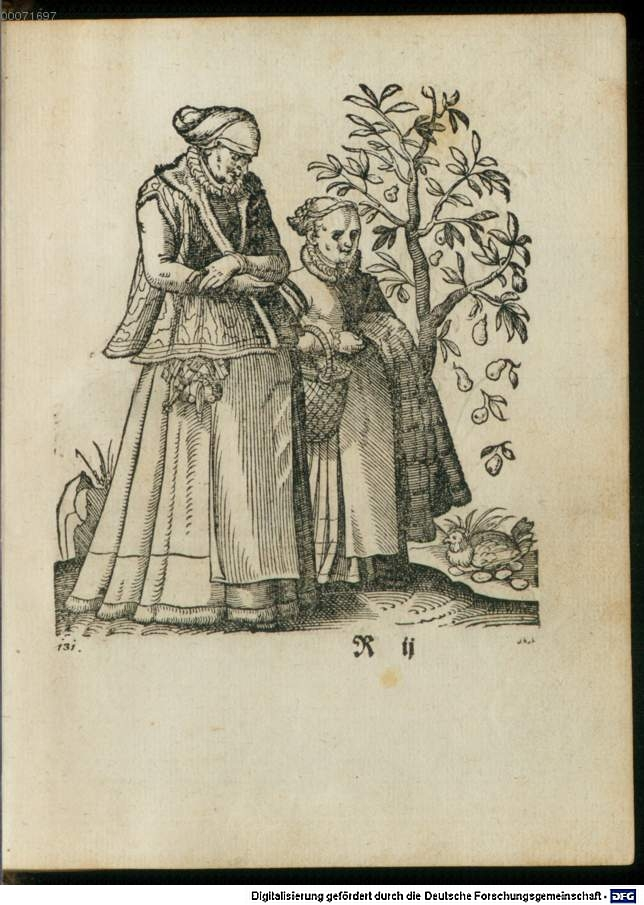
Figure 2. aus Amman, Jost:Kunstbüchlin (Franckfurt a. M. 1599)
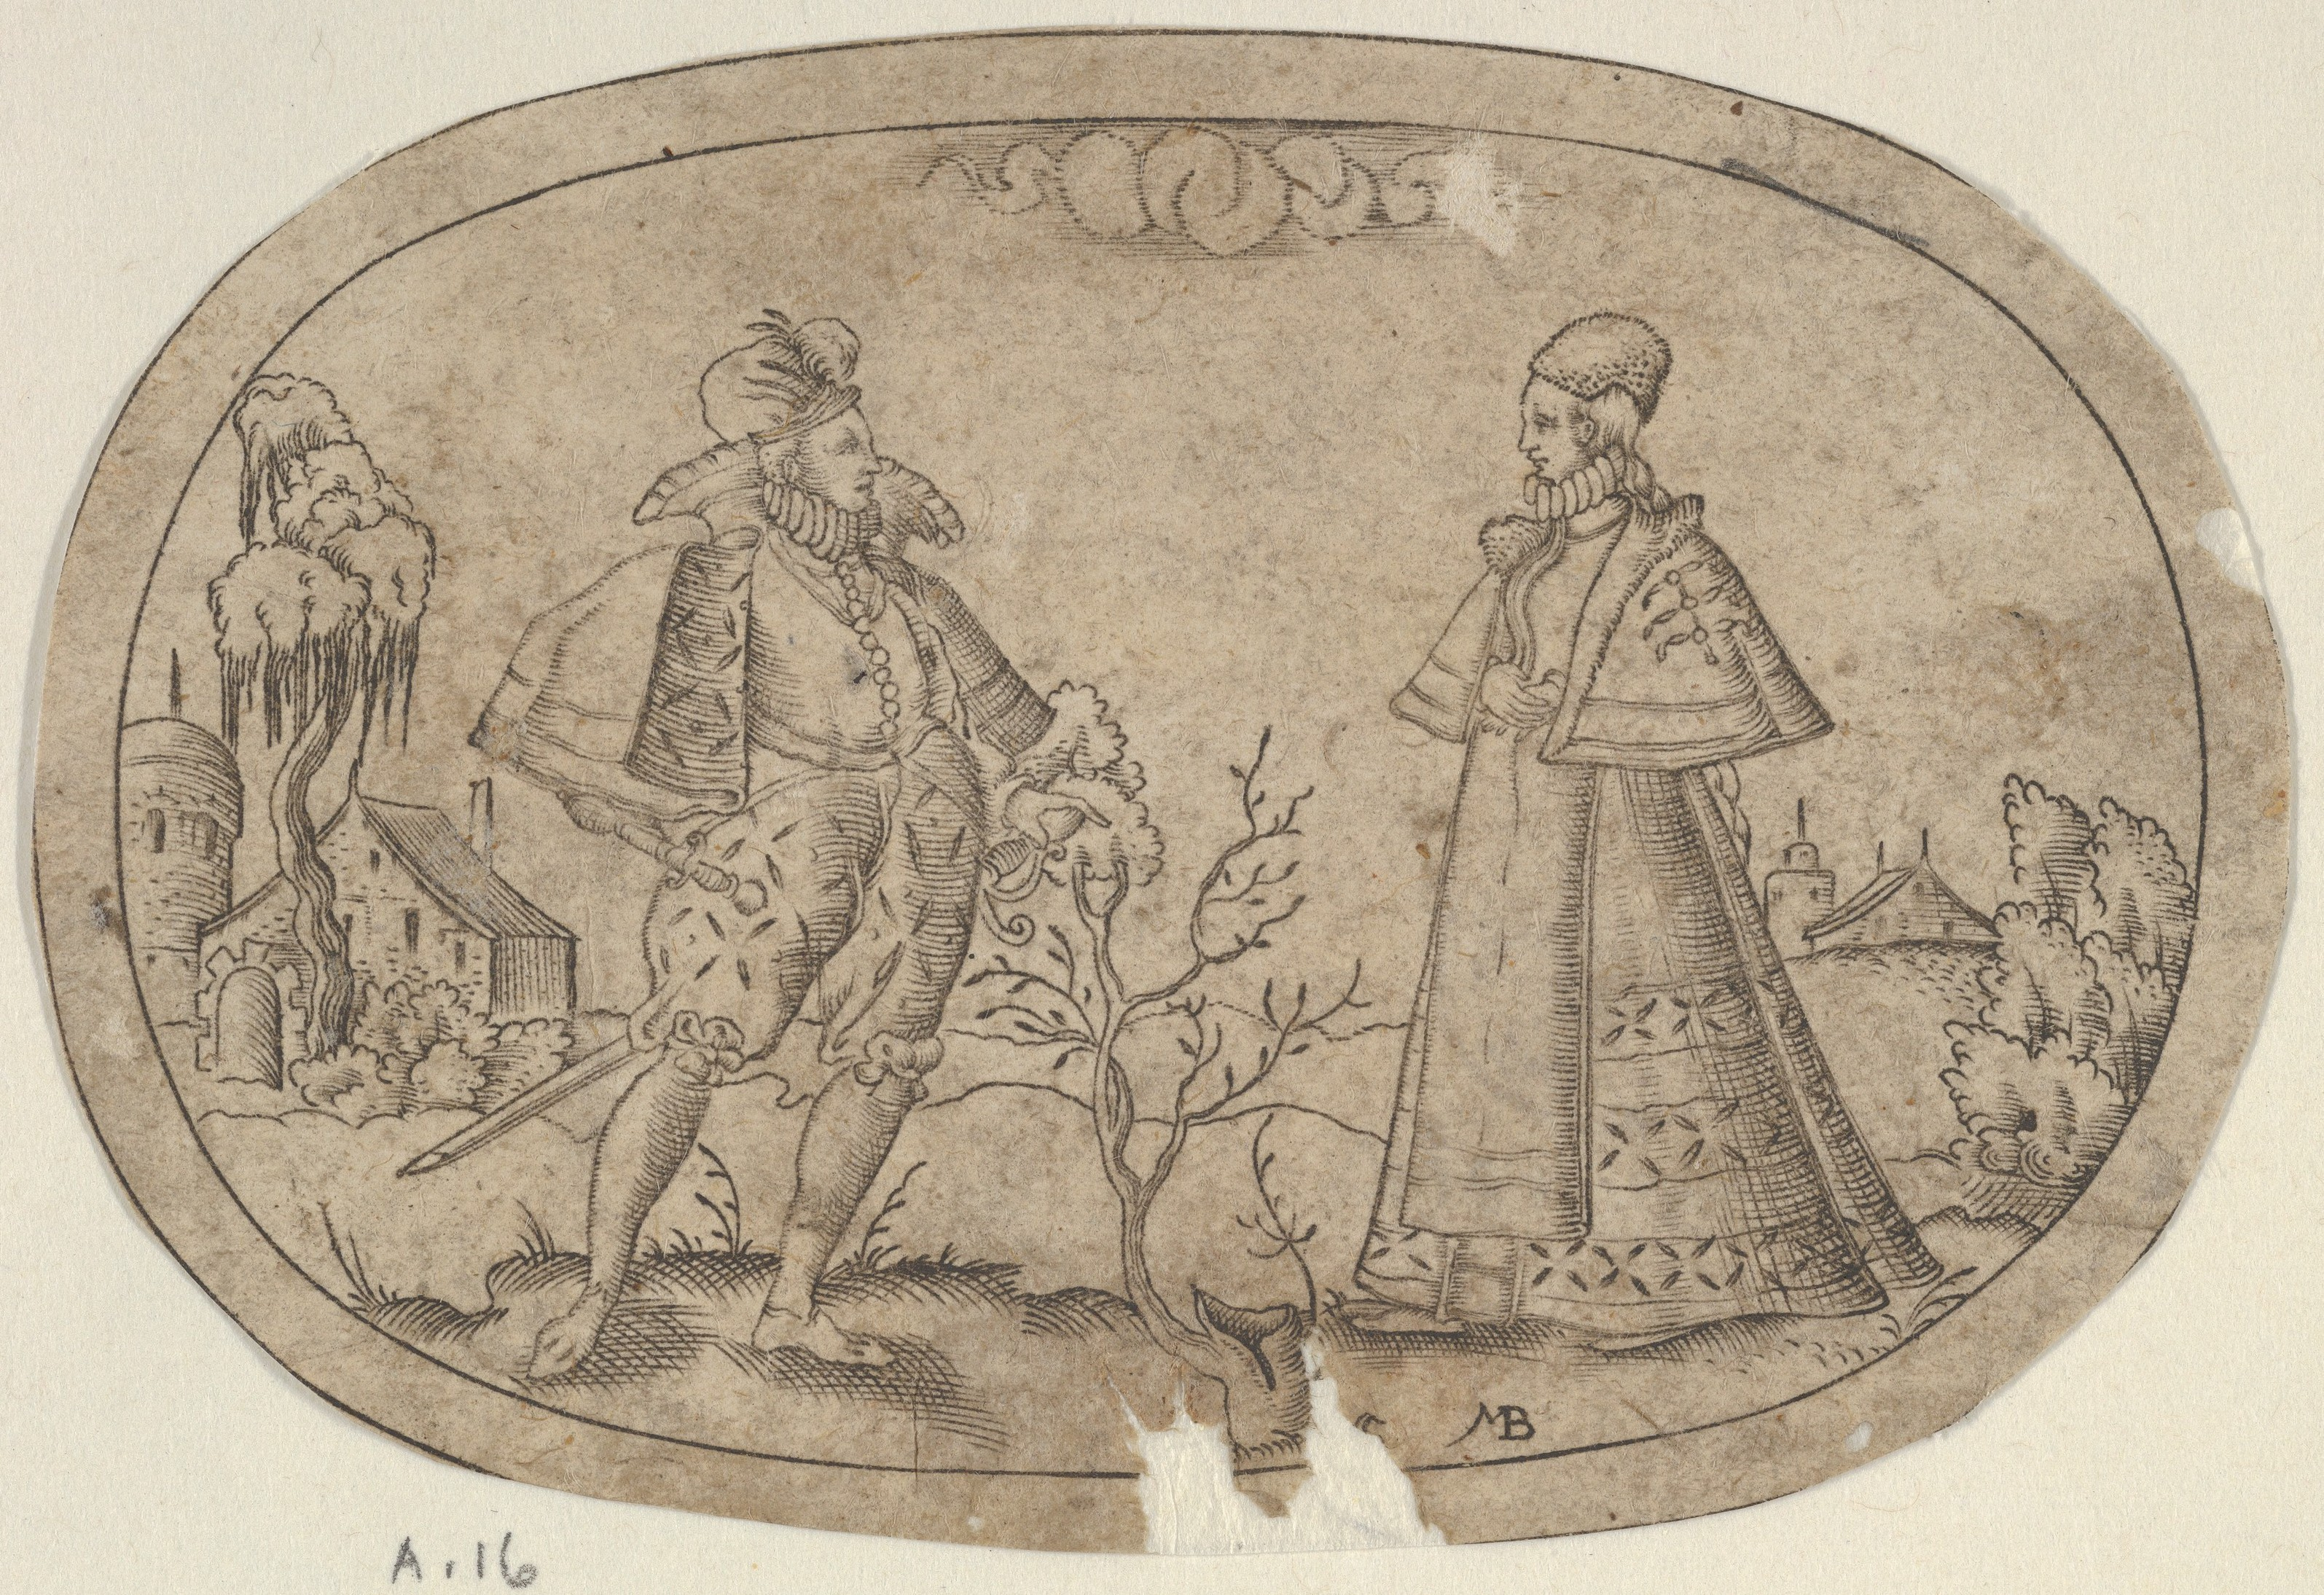
Figure 3. A Gentleman and a Lady, from Das Bossenbüchlein ca. 1582 Mathais Beitler
Primary Tools:
The making of steel needles (then known as a Spanish needle, from being brought to Spain by Moors) is mentioned in 1598 has having been first taught in England by a German.2 Thus, steel needles were likely in production and use in German speaking areas by this time. Needles were used for a huge variety of tasks, as they are today. I would guess various different tasks would be best suited to different sizes and types of needles - but which tasks would have been matched with which exact needles I am only guessing at. Modernly, trained tailors are told "a needle needs to be short for speedy sewing".3 I would guess that this would have been similar for hand sewing from other times. Professionally trained modern tailors use thimbles on the second finger of the dominant hand.4 These thimbles are dimpled on the sides and are ring-shaped without tops. Metal thimbles with flat tops were likely popular around 1600 in what is now Germany.5 There are however a variety of shapes of surviving thimbles from the time period and in a variety of materials such as bronze, copper, and gold plated silver. I will be using a ring style thimble found in East Anglia and dated to the 14-15th century.

 Figure 4. linen thread and beeswax block / Figure 5. ring thimble
Tailors would have used chalk to lay out the pattern before cutting.6 I do the same, though the tailor's chalk I have is not plain chalk. It is probably a wax mixture, though I have had the piece I use now for a long time and do not have the packaging it came in. Shears would then have been used to cut out the pieces. Mine happen to have modern plastic handles, but the pivoted construction and the blades doing the work would be very similar to period tailor's shears.
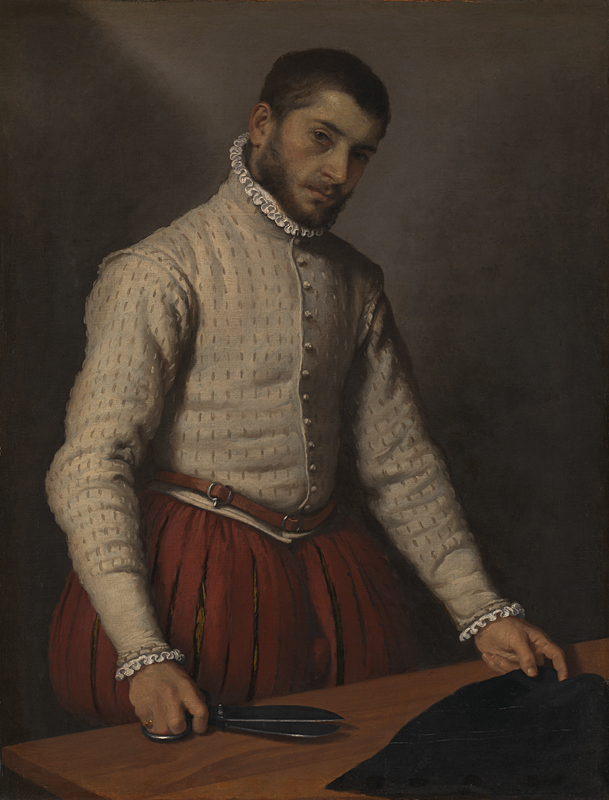
Figure 6. The Tailor by Giovanni Battista Moroni, 1565-1570
Note the shears held and the faint white lines on the fabric.
Materials:
The tailors' manual suggests suitable fabric for the garment: dobin for the outer layer, samat for the trim, and leinwat for the lining.7
Leinwat, as it sounds, is indeed a linen. It's a basic linen, usually with a plain weave.8 That is what I will be using for my project.
Dobin and samat are both described as silk cloths. Dobin is a lesser quality silk than atlas, and similar to taffeta.9 Samat is essentially a silk velvet, used for trimmings.10
As per my objective of having a garment that is both warm and good in wet weather, I intend to replace the recommended silk with wool. Wool is a common period material. It is conceivable that a lady may have had a fine schaube made in silk for special occasions with another more 'everyday' schaube for more general use. Additionally, the less well off would likely have worn similar styles in materials more accessible to their financial means. Further, a woolen schaube is mentioned in an inventory - said to be made of vorstat.11
I purchased some 'probably wool' from a second hand sale a while ago. A burn test of a small swatch indicates that it is likely a wool blend with some modern artificial fibres mixed in. The swatch is hesitant to catch the flame or spread the fire once burning. After the flame is put out the edge is left with a very small amount of melted fibre.
 Figure 7. wool fabric sample
The wool is a nice light brown - conceivably the colour could be achieved with natural dyes. The fabric is thick and woven with a pattern of diagonal lines.
Accurate silk velvet is not what I am going to use for trimming, for several reasons. Actual 100% silk velvet, in a period relevant weave/weight, is exceedingly difficult to find. Most modern "silk velvet"s are really a silk blend - often a small amount of silk mixed with a large amount of rayon for example. A modern slinky silk velvet blend is not accurate for the late 16th century - it should historically have more weight/body to it. If I could find a silk velvet of a suitable description, it would likely be exceedingly expensive. Since I am replacing the base fabric with wool, I will keep the fibres the same and replace this with a wool as well. I have a dark green left over from trimming a dress that may be just enough for a thin trim for this as well.
The tailors' manual does not state recommended thread material, but obviously some is needed. Linen thread was in common use, and often waxed for strength in the 16th century.12 I have a spool of plain (undyed) linen thread and a block of beeswax that shall serve this purpose.
Techniques/Processes:
The tailor's manual comes with no instructions for how the garment pieces should be put together, how the lining should be put in, how the trim should be attached, or how the seams should be finished. The document is meant for the testing of those trained as tailors in the 16th century after all, and a tailor ought to know how to do all of those things well before he attempted his test. So I turn to other references for insight into the relevant techniques.
As far as I know, there are no extant examples of this garment. The closest I can get is finding other similar garments.
Viewing the inside construction details of another 1610-1620 women's silk outer garment might be instructive; for example the 'Gown of mulberry-coloured Italian silk velvet' pictured in book two of Seventeenth-Century Women's Dress Patterns.13 The back is gathered here with neat box pleats, the upper back is heavily quilted which would give a fair bit of structure, the lining is felled to the collar, the sides are sewn together with a couple different techniques including a focus on matching the pattern on the right side. An X-ray view of the inside shows rows of pad stitching along the collar along with at least one layer of wool and buckram.
Another 1610-1620 silk velvet over gown is described as having selvedges as
seam turnings, clipped at regular intervals and the yoke is described as stiffened with several layers of linen.14
A 1560-1590 men's velvet panel cloak has a collar described as stiffened with canvas and lined with linen. The lining of the body is also described as "eased round the edge of the velvet cloak so that it does not pull".15
A 1570-1580 semi-circular cloak with a hood is described as being a "thick, natural woolen cloth with a twill weave, resembling a blanket" and the raw edges at the neck are "a straight strip of wool slip-stitched over them" for a finished width of 3.2cm (1 1/4").16 The seams are described as run and felled with a finished width of 13mm (1/2"). The hem is left unturned and has a 2 ply brown wool embroidered over the edge with a buttonhole stitch to prevent fraying. The hood is lined in wool and sewn to the cloak with linen thread
Pad stitching showing on the outside of 16th century garments is relatively rare, and the smaller stitches should be towards the outside if seen.17
Leaving edges raw is mentioned as most common "in cloaks of well-fulled wool"18.
Having looked at several extant overgarments, noting above some of the most applicable construction details to the garment I am intending to make, my plan for construction is as follows.
The back will be gathered into the yoke using box pleats. This is seen on a few over gowns (as opposed to circular cloaks without a yoke), and seems like a good treatment for the fairly thick wool I will be using as compared to a bulkier gather.
The interior seams of the cloak will use a combination of running stitch and back stitch to compromise between speed and strength. Running stitch was used for seams that would not be under much strain and backstitch was used for constructional seams requiring strength.19 The only seam that will be under much strain in this garment is where the yoke and back attach.
To keep the wool seams from being too bulky I intend to fell them down in place without the additional turn. They will be protected by the lining and the wool is also felted enough to be unlikely to fray regardless.
The lining will be primarily made up separately and felled into place inside the garment.
The collar will be stiffened with muslin cabbage from other past projects. This will be of course a modern cotton. A linen would have been more likely to be used, but this fabric is closer to an appropriate weight and stiffness than any linen I have. Cotton was known in Europe at this time, cotton wadding was commonly used as stuffing, and cotton thread was used as a weft in some fabrics. Some pure cotton fabrics were also being imported from east of Europe at this point.20
The trim will be slipstitched on, and additionally used as a binding for the edges. The images of the garment being worn both look like the lapels are trimmed with fur (or are completely lined in fur), and the edges seem fluffy. It is a little hard to see where the trim goes on the garments, though it does sort of look like a separate stripe removed from the edge. Given that edge binding was not uncommon for other garments like doublets or stays, and it is a great way to reduce the bulk at the edges compared to hemming the thick wool, it's what I'll try using here.
Scaling up the pattern and testing it:
A tailor would be expected to be able to draft these shapes from his training before his testing. I however have never put together this garment before, nor have I even seen one in person! Thus I resort here to a somewhat modern method of learning and testing the shape of the garment - I have no 16th century master tailor to study under after all. Pattern paper over a grid along with a ruler and a pencil should allow me scale the cutting diagram to an appropriate size. Next as a test run the shapes are quickly cut out of sheet material and machine basted together to check the pattern is reasonable.
The first thing I have to do, as a modern person without having gone through the tailor's apprenticeship from the time, is to scale the pattern. In the relevant time period the tailor would have trained such that these patterns could be laid out onto the fabric from memory. In fact, that is a large part of how we have the manuals that I am now working from. These books were documents for testing what a journeyman should know to become a master, including a test to lay out garments via chalk lines on fabric.21 Given that I have never made a schaube before, never mind memorized the proper proportions and layout of the garment, I will start by scaling the garment onto a pattern paper based of the given measurements of 80cm long with a hem of 5.1m.
 Figure 8. pattern paper laid out for drafting
The back height (52mm), front height (62mm) and back-including-collar height (65mm) are all different, so I used the hem measurement for scaling instead. A front panel hem is 75mm to a back panel hem's 107mm. A total hem of 364mm on the diagram for an actual hem of 5.1m gives a scale of about 14x. That would give relative lengths of 72.8cm, 86.8cm, and 91cm, which tells me that the diagram is not completely in proportion to the given measurements. It should be close enough for referencing/drafting however.
The two artistic reference images identified as Schaübel in Drei Schnittbucher give further ideas of proportion. These images are also included here in the Reference Aesthetics section. Though both women have their arms bent in front of them, the Schaube can still be examined in relation to arm length. The first would have the hem just above wrist height and on the second the hem would be just below the elbow.As clothing was made for specific people instead of mass produced off-the-rack measurements, it seems relevant to see where those measurements would fall on the intended wearer. On me 'just below the elbow' would be a length of about 45cm, 'just above the wrist would be around 65cm, and a length of 80cm would reach almost to my fingertips. Both the illustrations look a fair bit shorter than where the given measurement would fall on me.
55cm seems like a nice length in between those measurements. That should be long enough to be substantial but short enough that it would be difficult to catch when sitting down. Reducing the given measurements to keep the proportions gives an appropriately smaller hem length and a new scaling ratio (length 80 -> 55, hem 5.1m x 0.6875 = 3.50625m, scaling ratio 14 x 0.6875 = 9.625).
2 back pieces:
back length = 50cm (quarter circle with a radius 67.4 gives the hem, cutting away the smaller quarter circle of radius 17.4)
1 back collar: back collar height = 12.5cm bottom width = 6.74cm upper hem = 27.9cm bottom edge to upper corner = 11.55cm cut away height = 4.81cm
2 front pieces: front length = 59.7cm front lapel = 9.6cm, lapel cut at 115 degrees to the front side length to cut out = 48.1cm
(55 degree partial circle of a 71.2 radius with shoulder cut outs that are likely to match the seam length of the back plus collar seam)
Now that the pattern pieces are all written out, my next step is to test that they all fit together. Used bedsheet mockup time! The mockup told me:
The pieces fit together wonderfully, so overall scaling was a success.
The back piece really gets gathered in to fit to the back of the collar. I used 4 double boxes along the back to match up the length. (One regular pleat would be a ration of 3 to 1, the fabric in front, the fold back, and then forward again. Another pleat on top of that changes the ratio to 5 to 1, the fabric in front, the fold back, and forward, and then back, and finally forward.) I am slightly concerned about the bulk this will create in the seam when using a moderately thick wool as planned for the finished piece. I may have to get slightly creative with the lining in this area to cover the inside of the seam without any extra finishing folds to the wool in this area.
The collar is large. I understand why the images of the have the collar and front flipped open. Otherwise the front overlaps somewhat, and the collar would go halfway up my ears and up to my nose in the front. And that's the slightly scaled down version!
As a corollary to the last point about the size of the collar - I underestimated just how much length would be taken up by the collar. My choosing a length that when measured with a tape would fall to the middle of my arm did not end up quite so long on the actual garment. Especially at the side as the cloak is essentially a semicircle draped on a frame that is oblong (shoulder width is much wider than the depth from front to back), the cloak curves up at the arm and hits almost exactly at my elbow! This feels like an inconvenient length and is markedly shorter than the illustrations. Probably this would be a better length on me scaled to the original hem/length recommendation.
The other corollary of number 3 is that I will probably want some reinforcement and shaping in the collar. I had been considering some sort of interlining or pad stitching as techniques common at the time (see also the comparative extant items), but had not yet decided anything as the book did not mention anything of the sort. The book does not give instructions however, and material for an interlining may have been insignificant enough to leave out of the materials list. Because the collar will have the lining/facing showing when open, I wouldn't want to pad stitch only the lining. To keep the large stitches from showing I would probably use an interlining, pad stitch that to the shell, and then cover it with the actual lining.
Next steps: scale my current pattern pieces up slightly by 1.45 times.
back: back length = 50->72.5cm (quarter circle with a radius 67.4->97.7 gives the hem, cutting away the smaller quarter circle of radius 17.4->25.2)
1 back collar: back collar height = 12.5->18.1cm bottom width = 6.74->9.8cm upper hem = 27.9->40.5cm bottom edge to upper corner = 11.55->16.7cm cut away height = 4.81->7cm
2 front pieces: front length = 59.7->86.6cm front lapel = 9.6->13.9cm, lapel cut at 115 degrees to the front side length to cut out = 48.1->69.7cm (55 degree partial circle of a 71.2->103.2 radius with shoulder cut outs that are likely to match the seam length of the back plus collar seam)
The pattern for the fully scaled garment is large.
Construction
After preparing and laying out the fabric, I used the pattern pieces I had drafted to chalk out the outlines to cut out. For cutting I used the floor as that was the large flat space available to me, and sewing shears.

 Figures 9 & 10. laying out pieces for cutting
The wool was backstitched mainly due to the thickness making it harder to do a quick running stitch. The linen was sewn together with a running stitch with occasional lock stitches for security, and all the finishing was done with a fell stitch (opening the wool seams, attaching the lining, and adding the binding trim).


 Figures 11, 12 & 13. wool backstitching and then felling the seams open to control bulk

 Figures 14 & 15. felling in the lining


 Figures 16, 17 & 18: marking out the binding, pinning in place and felling down
Closing comments
The binding and lining once sewn together very much changed the shape of the drape at the front which I found fascinating. The drape all of a sudden looked a lot more similar to the illustrations of the garment lined in fur. This makes sense to me as the skin of the fur plus the outer fabric would make a much more substantial edge than just about any single fabric edge, and the two layers joined along with the additional binding layers also strengthen the edge much more than the previously loose single edges.
Don't try to cheat two layers into being the same length for an edge binding. Sure easing then to be just a few centimetres over works when it's flat, but that ease will bubble out when it is held up. I patterned nett (without seam allowances), then cut with seam allowance. Thus eyeing the seam allowance additions meant that the bottom edges did not perfectly match up everywhere. Trimming to match produces much nicer finishes than pulling the shorter fabric down and building in ease.
Proportions from the pattern mean that a very large amount of fabric is gathered down to attach the upper back and collar. If I were to make another Schaube I might take the pattern diagram a little less literally and reduce this proportion as it feels somewhat excessive.
Figures:
Cutting diagram and instructions from Leonfeldner 20r (Drei Schnittbücher)
aus Amman, Jost:Kunstbüchlin (Franckfurt a. M. 1599) https://bildsuche.digitale-sammlungen.de/index.html?c=viewer&bandnummer=bsb00071697&pimage=00149&lv=1&v=100&l=en#
A Gentleman and a Lady, from Das Bossenbüchlein ca. 1582
Mathais Beitler https://www.metmuseum.org/art/collection/search/423410 Accession Number: 55.503.18(2)
materials photo
materials photo
The Tailor by Giovanni Battista Moroni, 1565-1570
https://www.nationalgallery.org.uk/paintings/giovanni-battista-moroni-the-tailor-il-tagliapanni
- materials photo
8 - 18. process photos
References:
Andere, Mary Old Needlework Boxes and Tools: Their Story and How to Collect Them. Devon: David & Charles Publishers Limited, 1971.
Arnold, Janet. Patterns of Fashion 3: The cut and construction of clothes for men and women c1560-1620. London: Macmillan Publishers Ltd, 1985.
Barich, Katherine and Marion McNealy. Drei Schnittbücher: Three Austrian Master Tailor Books of the 16th Century. Nadel und Faden Press, 2015.
Gnagy, Mathew. The Modern Maker Vol. 3 Hand Sewing Stitches for Garment Construction. Kindle Direct Publishing, 2020.
Mikhaila, Ninya and Jane Malcom-Davies. T_he Tudor Tailor: Reconstructing sixteenth-century dress._ London: Batsford, 2006.
North, Susan and Jenny Tiramani eds. Seventeenth-Century Women's Dress Patterns Book Two. London: V&A Publishing, 2012.
1Katherine Barich and Marion McNealy Drei Schnittbücher pp. 6-7
2Mary Andere Old Needlework Boxes and Tools p. 59
3Mathew Gnagy The Modern Maker Vol. 3 Hand Sewing Stitches for Garment Construction p. 148
4Mathew Gnagy The Modern Maker Vol. 3 Hand Sewing Stitches for Garment Construction pp. 146-149
5Mary Andere Old Needlework Boxes and Tools p. 91
6Katherine Barich and Marion McNealy Drei Schnittbücher p. 10 (point 5)
7Katherine Barich and Marion McNealy Drei Schnittbücher p. 263
8Katherine Barich and Marion McNealy Drei Schnittbücher pp. 41-44
9Katherine Barich and Marion McNealy Drei Schnittbücher p. 52
10Katherine Barich and Marion McNealy Drei Schnittbücher p. 51
11Katherine Barich and Marion McNealy Drei Schnittbücher p. 231
12Ninya Mikhaila and Jane Malcom-Davies The Tudor Tailor p. 42
13Susan North and Jenny Tiramani Seventeenth-Century Women's Dress Patterns Book Two pp.18-33
14Janet Arnold Patterns of Fashion 3 pp. 120-121
15Janet Arnold Patterns of Fashion 3 p. 96
16Janet Arnold Patterns of Fashion 3 p. 97
17Mathew Gnagy The Modern Maker Vol. 3 Hand Sewing Stitches for Garment Construction pp. 26-27
18Ninya Mikhaila and Jane Malcom-Davies The Tudor Tailor p. 42
19Ninya Mikhaila and Jane Malcom-Davies The Tudor Tailor p. 53
20Ninya Mikhaila and Jane Malcom-Davies The Tudor Tailor p. 38
21Katherine Barich and Marion McNealy Drei Schnittbücher p. 10 (point 5)